

DW Cloud and Licensing Connection Issues (5.0 and Higher)
-----------------------------------
Affected Roles: Administrator, Power Users
Related Digital Watchdog VMS Apps: DW Spectrum Professional
Software Version: 5.0 and newer
Last Edit: September 9, 2025
-----------------------------------
Issue Outline
Some DW Spectrum Servers may experience connection issues with the DW Cloud remote network after upgrading Servers to software version 5.0. This is likely due to expired security certificates on the host machine interfering with DW Cloud connections and new certificates that are necessary to function with Digital Watchdog services.
Some symptoms may include:
- Failure to Activate Licenses
- Failure to Add a Cloud Owner Account
- No remote access with DW Cloud from the DW Spectrum Client (desktop), DW Spectrum Mobile (app), or Web Admin (browser).
- The DW Spectrum Server appears as “offline” or “unreachable” when trying to connect.
- In some cases, the Server may be incorrectly reporting that it is using DW Spectrum version 4.2.
- Local Cloud connectivity works when connecting through the DW Spectrum Client (desktop), but when connecting with the Web Admin (browser) there is no information provided.
Possible Cause of the Issue
After updating to DW Spectrum v5.0, with “verbose” logging configured, many of the server logs for the DW Spectrum Server will report issues with certifying “DST Root CA X3” and “ISRG Root x1”.
“DST Root CA X3” is an older format that was previously used and has since been replaced by “ISRG Root X1”. If you are experiencing the issues and circumstances outlined above, the DST Root CA X3 (older/outdated) may be overriding the authentication of the ISRG Root X1 certificate (newer).
A possible fix for this issue is to disable the outdated security certificate DST Root CA X3 and install the Amazon Root CA 1, ISRG Root X1, and Starfield Root Certificate Authority – G2 certificates.
Common missing certificates can include:
- Amazon Root CA 1 (Issued by Amazon Root CA 1)
- Amazon Root CA 1 (Issued by Starfield G2)
- Starfield G2
- Amazon RSA 2048 M03
- ISRG Root X1
Troubleshooting
Disable the DST Root X3 Certificate
To resolve the issue:
- Directly at the DW Spectrum Server, run the “mmc” command. You can launch this with either the Command Prompt application or through the START W menu.
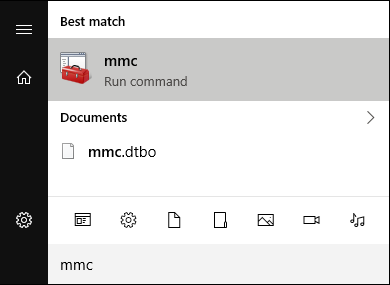
- The Microsoft Management Console (MMC) will display.
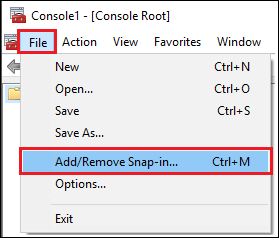
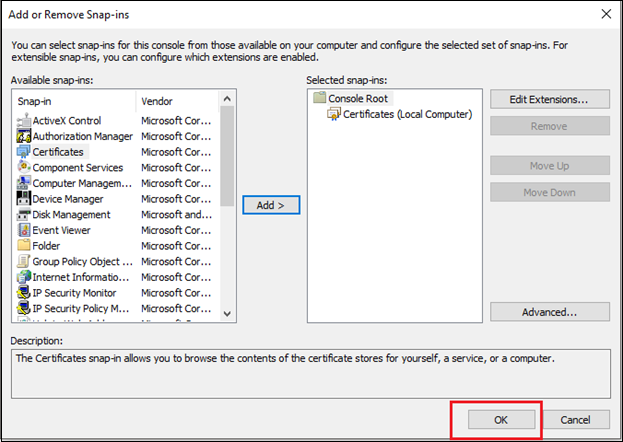
Click “File” and select “Add/Remove Snap-in”.
- Select “Certificates” from the Available snap-in list, then click the Add> button.

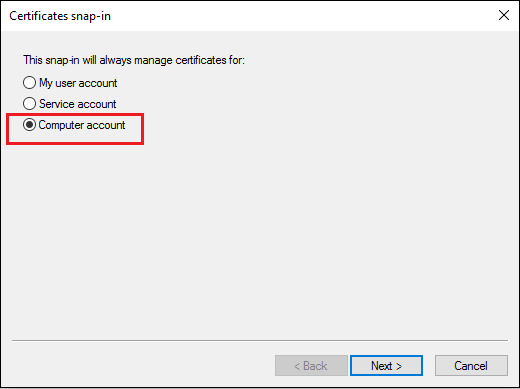
- Select “Computer Account” then click the Next button.
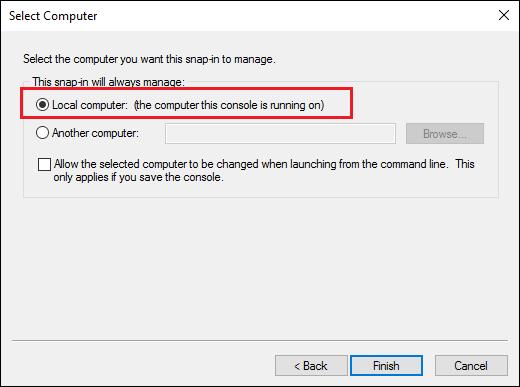
- Select “Local Computer” then click the Finish button.
- Click the OK button.
- The MMC window will display again.
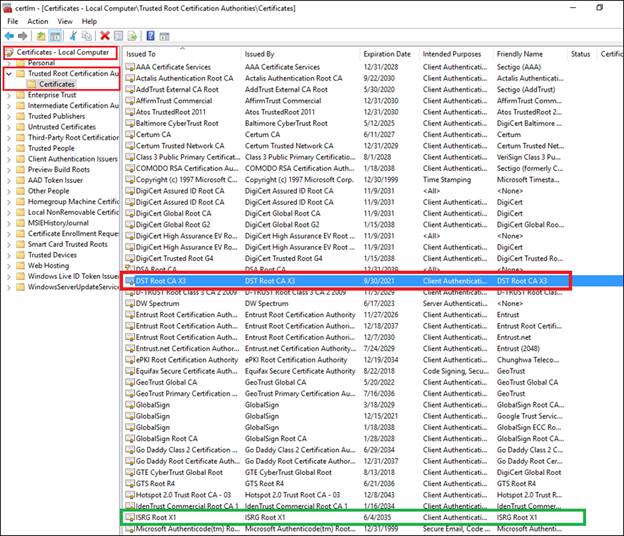
From the left-pane, select “Certificates (Local Computer)”, “Trusted Root Certification Authorities”, and then “Certificates”.
Locate “DST Root CA X3” and “ISRG Root X1”. The Expiration Date will display beside the certificate.
**NOTE: If you do not have ISRG Root X1, see the section “Download ISRG Root X1” below.
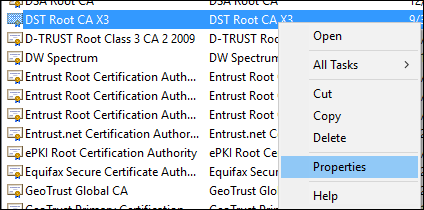
- To disable the DST Root X3 certificate, right-click on “DST Root CA X3” and select “Properties”.
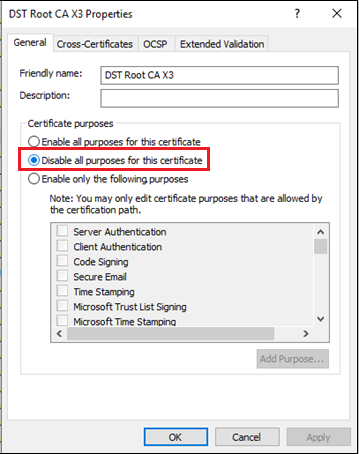
In the DST Root CA X3 Properties, change the Certificate purposes setting to “Disable all purposes for this certificate” then click the Apply button.
Click the OK button to close the properties window.
- Close the MMC and save the changes.
After disabling DST Root CA X3, restart the Server computer to allow the changes to take effect.
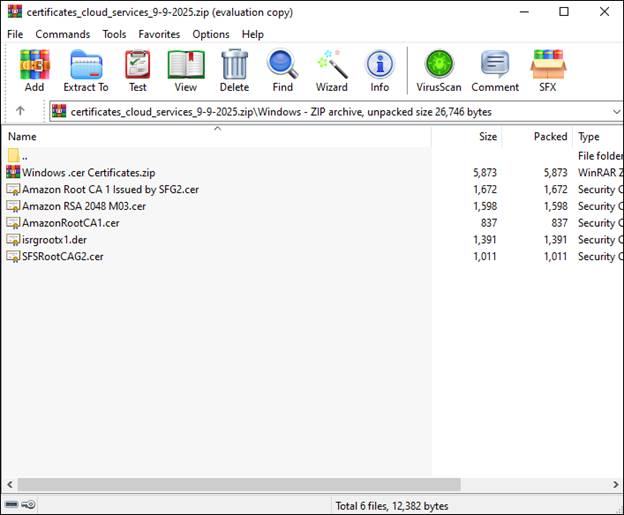
Download ISRG Root X1, Starfield Root Certificate Authority – G2, and Amazon Root CA1
If you do not have ISRG Root X1, Starfield Root Certificate Authority – G2, or Amazon Root CA1 installed:
- Download the missing certificates by Clicking Here.
Open the compressed folder and extract the missing certificates for your Server.
- Open the certificate file and click on “Install Certificate”.
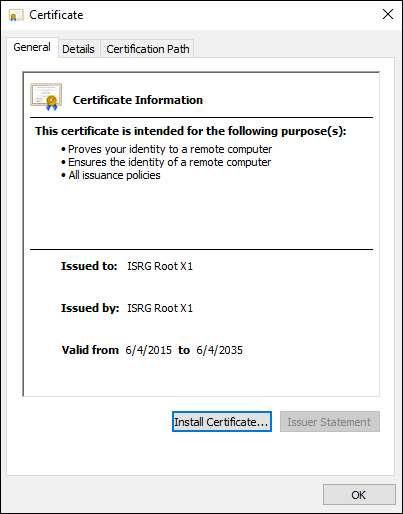
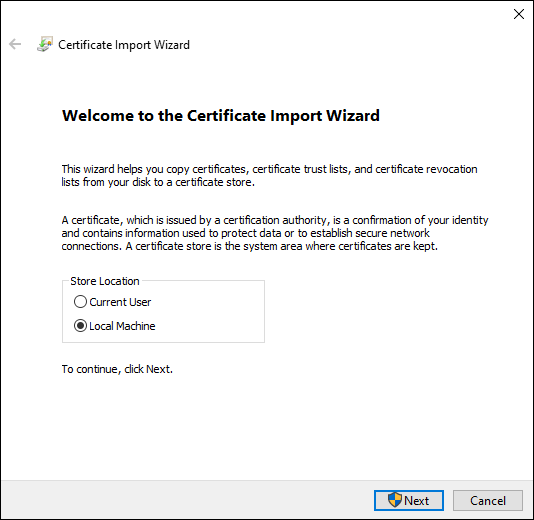
- Select “Local Machine” and click “Next”.
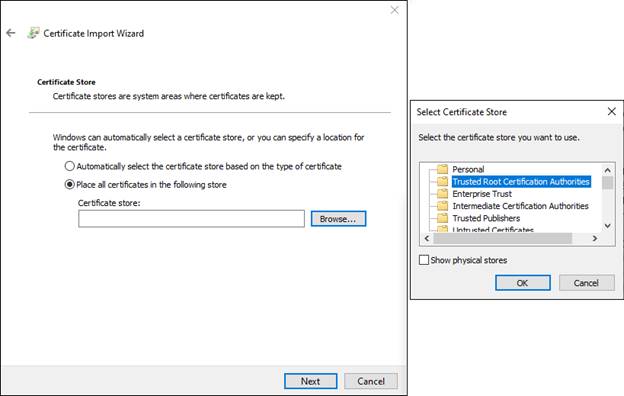
- Select “Place all certificates in the following store” and click the Browse button.
Select the “Trusted Root Certification Authorities” folder and click “OK”.
Click “Next” to proceed.
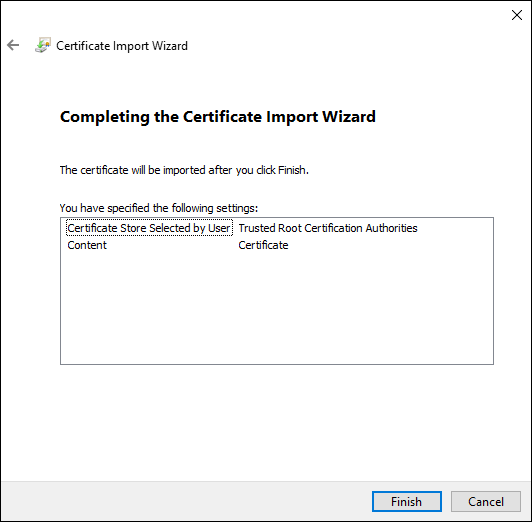
- The Certificate Import Wizard will display a summary before importing the security certificate. Click the Finish button to apply.
Restart the Server computer after the ISRG Root X1 security certificate has been imported.
- Repeat this procedure for all certificates that may be missing from your Server.
- Amazon Root CA 1 (Issued by Amazon Root CA 1)
- Amazon Root CA 1 (Issued by Starfield G2)
- Starfield G2
- Amazon RSA 2048 M03
- ISRG Root X1
______________________________________________________________________________
For More Information or Technical Support
DW Technical Support: https://www.digital-watchdog.com/contact-tech-support/
DW Sales: [email protected] | www.digital-watchdog.com
Rev: 06/25 Copyright © DW. All rights reserved. Specifications and pricing subject to change without notice. ![]()

