

Ai Analytic Rules Setup
-----------------------------------
User Group: Administrator, Power User
Related DW Application: DW Spectrum
Software Version: 6.0
Last Edit: March 18, 2025
-----------------------------------
DW MEGApix Ai and Blackjack Ai Analytics
DW MEGApix Ai cameras integrate advanced deep learning capabilities directly at the edge, enabling real-time object detection and event alerts. Camera video streams are actively processed and analyzed in real-time by the embedded Ai analytic engine as they are sent to the recording server, increasing analytic efficiency, reducing latency and network load, while preserving video quality.
DW Blackjack Ai Servers leverage server-side analytic processing to enhance video intelligence and can be deployed to accompany existing security setups and standard DW Blackjack recording servers. Like MEGApix Ai cameras, video analytics are processed centrally to reduce the load on edge devices. As a result, video streams from preexisting (non-Ai) cameras can be analyzed by the Ai server, offering a cost-effective solution to elevate existing DW Spectrum systems in manageable stages, without needing to replace standard camera hardware.

By being able to analyze video footage in real-time, you can implement intrusion detection for sensitive areas, log and manage ANPR license plate detections, and automate your security setup. Further enhance surveillance efficiency and minimize unnecessary alerts by also creating parameters to filter out ambient elements like foliage or vehicle traffic, which may be irrelevant to your security needs.
This article will outline how to create and configure the various analytic detection zones, non-detect zones, and detection lines with DW Ai analytic products.
**NOTE: Operation of DW MEGApix Ai PTZ cameras differ slightly from non-PTZ MEGApix Ai cameras, as they do not support all the same analytic rules.
Supported/Affected Devices:
- DW MEGApix Ai Cameras
- DW Blackjack Ai Servers
Detection Zones and Analytic Rules
Through Deep Learning technology, intelligent analytics use scene recognition and advanced object recognition for motion tracking and event rules. DW Ai products come equipped with 12 built-in algorithms for customizable surveillance setups, tailored to specific security needs.
Analytic rules can be created within the camera’s web interface through the DW Spectrum Client or using a web browser.
**NOTE: To view analytic rules in the camera’s preview window, the Burnt-in Annotation feature must be enabled within the camera.


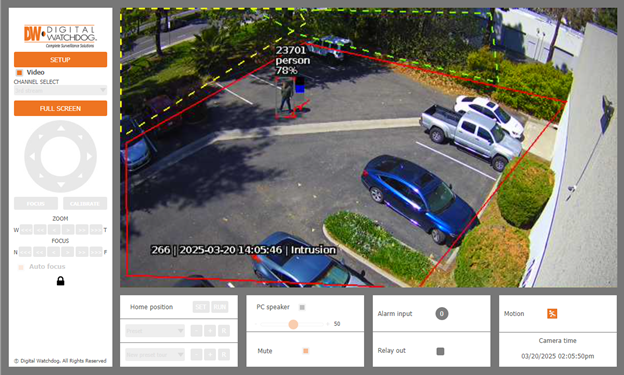
Creating an Intrusion Zone Rule
An Intrusion Rule will trigger an event when a person or object is detected within a designated region of interest (ROI). This may be particularly useful when monitoring an exclusive area for trespassing.
To create an Intrusion Rule:
- Open the camera’s web page and open the Setup menu.
- Select the MEGApix Ai tab and open the Rules menu.
- Click the ADD button and select “Intrusion”.
- Click-and-drag to move and shape the ROI in the camera preview window. Clicking on an uncolored node will add an additional side to the ROI, allowing the creation of complex shapes.
- In the Rule Property section, enter a custom name for the rule and select the object classes that will trigger this rule.
- [Optional] In the Event Actions section, select the type of Event Notification and Action Rule that will occur when the Intrusion Rule triggers.
- Click the Save button to apply the rule to the camera.

Creating a Line Crossing Rule
A Line Crossing Rule will trigger an event when a person or object is detected crossing a virtual tripwire. This could be useful for monitoring traffic through doors, walkways, and along border areas.
To create a Line Crossing Rule:
- Open the camera’s web page and open the Setup menu.
- Select the MEGApix Ai tab and open the Rules menu.
- Click the ADD button and select “Line Crossing”.
- Click-and-drag to move and shape the detection line in the camera preview window. Clicking on an uncolored node will add an additional side to the line, allowing the creation of complex shaping.
- In the Rule Property section, enter a custom name for the rule and select the object classes that will trigger this rule.
- [Optional] In the Event Actions section, select the type of Event Notification and Action Rule that will occur when the Line Crossing Rule triggers.
- Click the Save button to apply the rule to the camera.

Creating an Enter Rule
An Enter Rule will trigger an event when a person or object is detected crossing into a designated region of interest (ROI).
To create an Enter Rule:
- Open the camera’s web page and open the Setup menu.
- Select the MEGApix Ai tab and open the Rules menu.
- Click the ADD button and select “Enter”.
- Click-and-drag to move and shape the ROI in the camera preview window. Clicking on an uncolored node will add an additional side to the line, allowing the creation of complex shapes.
- In the Rule Property section, enter a custom name for the rule and select the object classes that will trigger this rule.
- [Optional] In the Event Actions section, select the type of Event Notification and Action Rule that will occur when the Enter Rule triggers.
- Click the Save button to apply the rule to the camera.

Creating an Exit Rule
An Exit Rule will trigger an event when a person or object is detected leaving a designated region of interest (ROI).
To create an Exit Rule:
- Open the camera’s web page and open the Setup menu.
- Select the MEGApix Ai tab and open the Rules menu.
- Click the ADD button and select “Exit”.
- Click-and-drag to move and shape the ROI in the camera preview window. Clicking on an uncolored node will add an additional side to the line, allowing the creation of complex shapes.
- In the Rule Property section, enter a custom name for the rule and select the object classes that will trigger this rule.
- [Optional] In the Event Actions section, select the type of Event Notification and Action Rule that will occur when the Exit Rule triggers.
- Click the Save button to apply the rule to the camera.

Creating an Appear Rule
An Appear Rule will trigger an event when a person or object is detected originating from within a designated region of interest (ROI).
To create an Appear Rule:
- Open the camera’s web page and open the Setup menu.
- Select the MEGApix Ai tab and open the Rules menu.
- Click the ADD button and select “Appear”.
- Click-and-drag to move and shape the ROI in the camera preview window. Clicking on an uncolored node will add an additional side to the line, allowing the creation of complex shapes.
- In the Rule Property section, enter a custom name for the rule and select the object classes that will trigger this rule.
- [Optional] In the Event Actions section, select the type of Event Notification and Action Rule that will occur when the Appear Rule triggers.
- Click the Save button to apply the rule to the camera.

Creating a Disappear Rule
A Disappear Rule will trigger an event when a person or object vanishes from within a designated region of interest (ROI). This can prove useful in situations where there is the possibility of someone concealing themselves in an area, hiding while within the camera’s view.
To create a Disappear Rule:
- Open the camera’s web page and open the Setup menu.
- Select the MEGApix Ai tab and open the Rules menu.
- Click the ADD button and select “Disappear”.
- Click-and-drag to move and shape the ROI in the camera preview window. Clicking on an uncolored node will add an additional side to the line, allowing the creation of complex shapes.
- In the Rule Property section, enter a custom name for the rule and select the object classes that will trigger this rule.
- [Optional] In the Event Actions section, select the type of Event Notification and Action Rule that will occur when the Disappear Rule triggers.
- Click the Save button to apply the rule to the camera.

Creating a Stopped Rule
A Stopped Rule will trigger an event when a person or object stops moving within a designated region of interest (ROI) for a set amount of time. This rule can prove useful for monitoring areas like no parking zones or areas that need to be kept clear of physical obstructions.
To create a Stopped Rule:
- Open the camera’s web page and open the Setup menu.
- Select the MEGApix Ai tab and open the Rules menu.
- Click the ADD button and select “Stopped”.
- Click-and-drag to move and shape the ROI in the camera preview window. Clicking on an uncolored node will add an additional side to the line, allowing the creation of complex shapes.
- In the Rule Property section, enter a custom name for the rule, a time threshold for the ROI, and select the object classes that will trigger this rule.
- [Optional] In the Event Actions section, select the type of Event Notification and Action Rule that will occur when the Stopped Rule triggers.
- Click the Save button to apply the rule to the camera.

Creating a Loitering Rule
A Loitering Rule will trigger an event when a person or object enters and remains within a designated region of interest (ROI) for a set amount of time.
To create a Loitering Rule:
- Open the camera’s web page and open the Setup menu.
- Select the MEGApix Ai tab and open the Rules menu.
- Click the ADD button and select “Dwell”.
- Click-and-drag to move and shape the ROI in the camera preview window. Clicking on an uncolored node will add an additional side to the line, allowing the creation of complex shapes.
- In the Rule Property section, enter a custom name for the rule, a time threshold for the ROI, and select the object classes that will trigger this rule.
- [Optional] In the Event Actions section, select the type of Event Notification and Action Rule that will occur when the Loitering Rule triggers.
- Click the Save button to apply the rule to the camera.

Creating a Direction Rule
A Direction Rule will trigger an event when a person or object is detected crossing a virtual tripwire while traveling in a specific direction. This rule can prove useful when monitoring one-way direction of travel, such as exit only doorways or areas.
To create a Direction Rule:
- Open the camera’s web page and open the Setup menu.
- Select the MEGApix Ai tab and open the Rules menu.
- Click the ADD button and select “Direction”.
- Click-and-drag to move and shape the detection line in the camera preview window. Clicking on an uncolored node will add an additional side to the line, allowing the creation of complex shaping.
Click and drag the circles on the edges of the direction arrows to rotate the direction and angle that objects or people must travel to trigger the rule.
- In the Rule Property section, enter a custom name for the rule. You can manually enter the Angle and Acceptance variables for the direction of travel. You may also select specific object classes that will trigger this rule.
- [Optional] In the Event Actions section, select the type of Event Notification and Action Rule that will occur when the Direction Rule triggers.
- Click the Save button to apply the rule to the camera.

Creating a Tailgating Rule
A Tailgating Rule will trigger an event when multiple people or objects are detected crossing a virtual tripwire within a specified amount of time of each other. This rule can prove useful when monitoring for trespassers trying to gain access to a location by shadowing authorized personnel through secure doorways.
To create a Tailgating Rule:
- Open the camera’s web page and open the Setup menu.
- Select the MEGApix Ai tab and open the Rules menu.
- Click the ADD button and select “Tailgating”.
- Click-and-drag to move and shape the detection line in the camera preview window. Clicking on an uncolored node will add an additional side to the line, allowing the creation of complex shaping.
- In the Rule Property section, enter a custom name for the rule. Enter a time Threshold for the minimum amount of time between line crossings that must occur and select the object classes that will trigger this rule.
- [Optional] In the Event Actions section, select the type of Event Notification and Action Rule that will occur when the Tailgating Rule triggers.
- Click the Save button to apply the rule to the camera.

Creating a Counter Rule
A Counter Rule will track the number of times a line or ROI zone rule has triggered, increasing or decreasing the tally depending on the settings. This rule can prove useful for keeping track of building capacity, monitoring foot traffic, and general statistic keeping.
To create a Counter Rule:
- Open the camera’s web page and open the Setup menu.
- Select the MEGApix Ai tab and open the Counters menu.
- Click the ADD button.
- Click-and-drag to move the counter in the camera preview window where the tally number will appear.
- In the Counter Property section, enter a custom name for the rule. You may configure the following options:
- Increment: select an analytic rule that will add to the tally.
- Decrement: select an analytic rule that will decrease from the tally.
- Occupancy: set the counter rule from the available list, which when triggered will add to the counter.
- Trigger Condition: define the counter threshold that will cause an event to be triggered.
- [Optional] Clicking the Reset Counter button will reset the tally number to zero. This action cannot be undone once performed.
- [Optional] In the Event Actions section, select the type of Event Notification and Action Rule that will occur when the rule’s trigger condition occurs.
- Click the Save button to apply the counter to the camera.

Creating a Non-Detect Zone Rule
A Non-Detect Rule will designate an area that the camera will ignore object detection and motion, which can prove useful for mitigating false alarms. Some common scenarios include when there is background motion from nearby roads and ambient movement from trees and foliage.
To create a Non-Detect Rule:
- Open the camera’s web page and open the Setup menu.
- Select the MEGApix Ai tab and open the Rules menu.
- Click the ADD button and select “Non-Detect Zone”.
- Click-and-drag to move and shape the ROI in the camera preview window. Clicking on an uncolored node will add an additional side to the zone, allowing the creation of complex shaping.
- In the Rule Property section, enter a custom name for the rule.
- Click the Save button to apply the rule to the camera.

______________________________________________________________________________
For More Information or Technical Support
DW Technical Support: https://www.digital-watchdog.com/contact-tech-support/
DW Sales: [email protected] | www.digital-watchdog.com
Rev: 06/25 Copyright © DW. All rights reserved. Specifications and pricing subject to change without notice. ![]()

