DW Spectrum – Users and Groups
-----------------------------------
Related Digital Watchdog VMS Apps: DW Spectrum IPVMS
Software Version: v6.0 and higher
Last Edit: November 13, 2024
-----------------------------------
This article contains the following information. You can select a specific item in this list to navigate directly to the desired information:
- Spectrum 6.0 vocabulary changes
- Accessing User Management Settings
- Predefined Default User/Groups and their properties
- Creating Custom Groups
- Adding Users
- Cloud User
- Local User - Temporary Users
- Adding
- Adjusting
- Usage
- Expiration - Disabling/Enabling & Deleting Users
- Basic LDAP Setup
Attention: This article is specifically for Spectrum version 6.0 and higher. If you are using version 5.1 or older, refer to these articles instead:
User Roles - Roles Management
DW Spectrum – Adding New Users and Assigning Roles
DW Spectrum – Integrate and Configure an LDAP Server
Spectrum 6.0 Vocabulary Changes
With the release of DW Spectrum IPVMS versions 6.0, some of the vocabulary has been adjusted to better represent the functions of a particular user as well as their permissions.
|
V5.1 and Older |
→ |
V6.0 and Higher |
|
“Role” |
→ |
“Group” |
|
“Owner” Role |
→ |
“Administrator” Group |
|
“Administrator” Role |
→ |
“Power User” Group |
|
N/A |
→ |
“System Health Viewer” Group |
The term “role” has been changed to “group”. Spectrum 6.0 introduces the functionality to allow a user to be part of multiple groups, making the use of the word “role” incorrect as it does not apply to any specific role.
The user role “Owner” has been changed to “Administrator” group. By default, Spectrum’s default root user is “admin”. This can be confusing, as it simultaneously existed with the “administrator” role, but used the “owner” role.
The user role “Administrator” has been changed to “Power User” group. This is to allow for the previously mentioned name change.
Accessing User Management Settings
User management settings can be found under the menu button in the upper left > User Management. It can also be found under System Administration > User Management.

Predefined Defaults
By default, DW Spectrum will have a single pre-existing local user, “admin”. The admin user will always use the Administrator group and cannot be deleted or changed to a different group as they are the “root” user of the system.
The default Groups have access to all cameras/devices on the system(except “System Health Viewers”), and their permissions are as follows
Administrators - Local “admin” user, and the first DW Cloud user account added to the system. This group has unlimited system privileges. They are the only predefined user group that can grant users the “power user” group.

Power Users – Users that have almost all the same rights as administrators but are unable to change certain functions, such as their own group/permissions or edit other power users.

Advanced Viewers – Users that have all necessary controls for monitoring: Live view, playback, exporting footage, and user input. Power Users and lower do not have access to video walls.

Viewers – Users that have the option to view live video, playback, bookmarks, and create exports, but no options for user inputs, editing device settings, or bookmark management.

Live Viewers – Users that can only view live streams of the cameras. No other functions are available for this group.

System Health Viewers – Users that can only view the health monitoring information of their servers in real-time. No access to any other properties of the system.

Creating Custom Groups
- Navigate to User Management > Groups. Here you will find all existing groups, as well as the option to add a group.

- A window will populate with the general sub-menu requesting a name for the group, a description of the group (optional), and an option to apply functions of multiple groups into a new group.

- The Groups submenu is a continuation of the “Permission Groups” under General. If you do not wish to create a group that will inherit the permissions of other groups, you can skip this.

- The Resources submenu is where you determine the permissions this group will have. Some permissions have pre-requisites where another setting is required to be available as well (For example, Exporting is only available if view archive is available)

Using your mouse, you can highlight the fields that you wish the group to have permissions to utilize. You can also use the drop-down menus to have more granular control over specific devices/resources.

- The Global Permissions submenu is where you can enable/disable the group permissions to access server logs and generate events.

- The Members submenu is where you can select existing users to be added to the new group if desired.

- Once your group has been configured with the desired settings, you can select Apply and OK. Enter your login credentials to complete the process.
Adding User Accounts
When selecting User Management, the landing page will be the Users submenu.

There are two types of users that can be added to a system: Cloud Users and Local Users. Permission-wise, they are functionally the same. The only difference is the methodology they connect.
Cloud Users
Cloud Users are the most common, as they allow for remote access and system management using our Cloud Services. To add users via Cloud, an Admin Cloud account must be added first. To add a cloud account as an admin, see the article regarding Cloud Management.
Local Users
Local users are user accounts not associated with a DW Cloud account. These user accounts only require some form of direct IP communication to the server, either via local IP or public IP/DDNS with port forwarding.
- Select the “Add User” button to start the process

- If you have DW Cloud set up, the server will give you the option to choose between adding a cloud user or a local user. If you do not have DW Cloud configured, the system will provide only a local option.

Cloud
Email: The email of the cloud account to be added.
Permission Groups: The group(s) the user will get permission settings from.
Local
Login: The login name the user will use.
Full Name (optional): The name of the user that will be using the account.
Email (optional): The email of the user associated with the account, used with email notifications (does not require a cloud account).
Access: As of 6.0, local users have a new option to be added as temporary users.
Password/Confirm Password: The password that will be used for the user.
Permission Groups: The group(s) the user will get permission settings from.
Allow (insecure) Digest Authentication: Used to enable or disable digest authentication. This option is necessary if you are using DW Spectrum API or proxying RTSP streams from your system. - The Groups submenu is a continuation of the Permission Groups setting from the previous step. A group is optional, however each user added without a group will need to have its resource permissions manually configured.
- The Resource submenu is where you can apply specific permissions if you do not use a group. You can select the functions you desire for the user to meet your specific needs.

- The Global Permissions submenu is where you can enable/disable the user’s ability to access server logs and generate events.

- Once you have configured your desired settings, select Apply and OK to finalize the user.
Temporary Users
Temporary users are a new addition to DW Spectrum as of 6.0. Temporary users are only available as local users currently.
Adding a Temporary User
To create a temporary user:
- Navigate to User Management and select Add User.
- Set the new user as a local user.
- At this point, this user can be configured the same as a normal local user. The primary difference is the options provided under Access. Set Access to “Temporary with link”.

Link Valid Until: This will set the finalized expiration date of the link to be used.
Revoke Access after Login: With this enabled, you will be presented with the option to set a timed expiration after the first login for minutes, hours, or days.

For example, you may set the link validity for a week to allow someone ample time to access the system, but enable a set time that will limit their access to the system. - Once you have your desired settings and add the user, you will be presented with a window indicating the user’s successful creation, as well as a link that can be copied and shared.
**NOTE: The inclusion of an email for the user does not email this link. The link needs to be provided to the user manually.

Temporary User Usage
Temporary User Link Options
If you fail to copy the link, wish to remove the link, or have a new link created, you can access the temporary user’s settings > Access Link.

Temporary User Access
With your browser of choice, paste the link and continue to the web page of the server. You will have the option to continue via the Web Client or to use the DW Client instead. Once either option is selected and a connection is established, the revoke timer will start if used.
**Note: Client use requires the client version to be the same as the server.

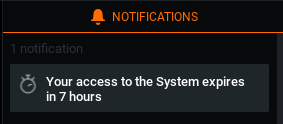
Both the Web Client and Client software will function as an ordinary user would. If using the client software, Spectrum will provide a client desktop notification for the remaining time.

Temporary User Expiration
If a user is accessing the account and the time expires, the user will be disconnected and met with a notification of the expiration. The same will happen if an existing link is terminated.

If you would like to refresh the temporary user, you can access the temporary user’s settings. Access Link will indicate there is no available link and will provide you with the option to set new parameters.

Disabling and Removing Users
Single User
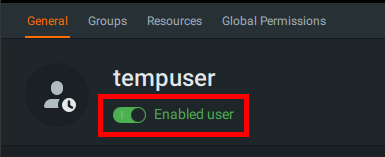
To Disable/Enable an existing user, you can select the user under User Management and toggle on/off the switch below their login name.

To delete the user, you can navigate to the user and find the option to delete the user.

Multiple Users
If you would like to disable/enable multiple users at the same, you can use the check boxes next to their profiles and select “edit”.

You will have the option to enable/disable the users, as well as adjust digest authentication.

If you would like to delete the users, simply select delete instead of edit.

LDAP
Configurations for the use of LDAP can be found under User Management > LDAP. Select the Configure button to access the system’s LDAP configuration settings.

The system will request the following Parameters:
Host(ldap:// or ldaps://): The directory in which the system will be pointed at. This domain should be the FQDN/Absolute Domain Name.
Login DN: The login for the domain.
Password: The password for the login.
Use StartTLS: Used with services utilizing the StartTLS protocol.
Ignore LDAP server certificate errors: Used to allow Spectrum to ignore SSL certificate errors.
Select the “Test” button to verify connectivity.
Once Spectrum can communicate with the directory, many options and functions pertaining to LDAP users and groups will be available.
Due to the sheer volume of information related to the use of this function, additional details for LDAP can be found accessing Spectrum’s built-in manual/help function and searching “LDAP”.
______________________________________________________________________________
For More Information or Technical Support
DW Technical Support: https://www.digital-watchdog.com/contact-tech-support/
DW Sales: [email protected] | www.digital-watchdog.com
Rev: 06/25 Copyright © DW. All rights reserved. Specifications and pricing subject to change without notice. ![]()


